Quick Moulding Facts: Types, Sizes, Materials & Costs
| Moulding Type | Common Sizes (W × H) | Typical Materials | Avg. Cost ($/LF)* | Common Installation Location |
|---|---|---|---|---|
| Baseboard | 3-1/4″, 4-1/4″, 5-1/4″ | MDF, FJ Pine, LVL | $1.20 – $3.50 | Wall–floor junction |
| Base Shoe | 1/2″ × 3/4″ | MDF, Pine | $0.60 – $1.50 | Added in front of baseboard |
| Quarter Round | 3/4″ × 3/4″ | MDF, Pine | $0.70 – $1.60 | Flooring expansion gap coverage |
| Crown Moulding | 3-1/2″, 4-1/2″, 5-1/4″+ | MDF, FJ Pine, PVC | $1.80 – $5.00 | Wall–ceiling transition |
| Casing | 2-1/4″, 3-1/2″, 4″ | MDF, FJ Pine, LVL | $1.30 – $3.80 | Door & window openings |
| Chair Rail | 2-1/2″ – 3-1/2″ | MDF, Pine | $1.10 – $2.80 | Mid-wall protection & detailing |
| Wainscot | Panel-based systems | MDF, PVC, Wood | $6.00 – $15.00+ | Lower wall sections |
| Shiplap | 1×6, 1×8 (actual varies) | MDF, Pine | $2.50 – $6.00 | Feature walls & accents |
| S4S Board (Flat Stock) | 1×4, 1×6 | MDF, Pine | $1.50 – $4.00 | Modern trims, wall details |
* Estimated material-only pricing. Based on standard residential profiles in 2026. Builder bulk pricing may vary by volume and region.

Interior moulding is no longer just a decorative detail. In modern residential projects, the right moulding profiles improve visual proportion, protect wall edges, and significantly increase perceived home value.
This guide breaks down interior moulding types, common sizes, materials, costs, and installation best practices, while highlighting five 2026 design-forward moulding ideas builders should know before specifying trim packages.
Interior Moulding 101: Types, Functions & Value
Interior mouldings are architectural trim elements designed to protect surfaces, define visual boundaries, and enhance the overall proportion of interior spaces. In residential construction, mouldings serve both functional and aesthetic roles, improving durability while elevating perceived home value.
Types of Interior Mouldings
Interior mouldings are architectural details that frame walls, floors, ceilings, and openings, adding depth, character, and protection. They can be organized using a visual hierarchy based on their placement in the room:
Top (Ceiling)
- Crown Moulding–Bridges the wall and ceiling, adding elegance and perceived height.Common Sizes: 3-1/2″ – 5-1/4″ height, 3/4″ – 1″ projection
- Frieze–Decorative horizontal band often placed just below the ceiling for subtle detailing.Common Sizes: 2″ – 4″ height
- Cove–Smooth curved transition between wall and ceiling, softening corners and creating a flowing visual effect.Common Sizes: 1″ – 3″ height
Middle (Wall)
- Chair Rail – Positioned mid-wall to protect against chair damage and divide wall sections for design purposes.Common Sizes: 2″ – 3-1/2″ height
- Picture Rail – Mounted high on walls to support hanging artwork without drilling directly into the wall.Common Sizes: 1″ – 2″ height
- Wainscoting – Covers the lower portion of walls for protection and aesthetics. Includes:Beadboard – VVertical narrow boards with a tongue-and-groove profile. Commonly used as wainscoting with heights of 32″ – 36″Shiplap – Horizontal overlapping boards for a modern farmhouse look. Height: 32″ – 48″Board & Batten – Wide boards with thin battens covering the seams, offering a textured, layered effect. Height: 32″ – 48″
Bottom (Floor)
- Baseboard–Runs along the floor-wall junction to protect walls from scuffs and finish edges.Common Sizes: 3-1/4″ – 5-1/4″ height, 1/2″ – 3/4″ thickness
- Base Shoe–A small trim installed in front of the baseboard to cover expansion gaps.Common Sizes: 1/2″ × 3/4″
- Quarter Round–Rounded trim that fills flooring gaps and completes the baseboard look.Common Sizes: 3/4″ × 3/4″
Openings (Doors & Windows)
- Casing–Frames doors and windows, providing a polished, finished edge.Common Sizes: 2-1/4″ – 4″ width
- Apron–Decorative trim under a window stool, enhancing visual appeal.Common Sizes: 3″ – 6″ height
- Stool–Horizontal surface of a window sill, used for both functional and decorative purposes.Common Sizes: 1″ – 3″ thickness, 3″ – 6″ width
In addition to standard interior mouldings, UWG offers S4S Board (Surfaced Four Sides), a smooth, flat board finished on all sides for versatile interior applications. Unlike traditional mouldings that have a fixed profile or placement, S4S boards are highly adaptable and can be used in multiple ways:
- Custom Trim & Mouldings: Cut and shape S4S boards to create chair rails, picture rails, baseboards, or simplified crown mouldings.
- Accent Walls & Paneling: Ideal for horizontal or vertical accent walls, wainscoting-style panels, or minimalist modern designs.
- Flexible Applications: Can be installed on walls, ceilings, or even as part of cabinetry and furniture projects, depending on project needs.

Visual and Perceived Impact of Interior Mouldings
Even small moulding details can dramatically change a room’s look and feel. For example:
- Crown Moulding: Adds 2–4 inches of perceived ceiling height, making rooms feel more spacious.
- Baseboards: Protect walls and create a clean boundary, reducing the visual clutter of gaps and uneven flooring edges.
- Chair Rails & Wainscoting: Divide walls into proportioned sections, introducing texture and visual rhythm that guides the eye naturally.
- Shiplap or Board & Batten: Adds pattern and layering, making plain walls appear more dynamic and architecturally intentional.
In practical terms, homes with well-installed mouldings are perceived as 20–30% more refined in visual quality compared to rooms without trim. Buyers often equate detailed interior mouldings with higher craftsmanship, better maintenance, and premium value, making them an effective investment for both aesthetic and market appeal.
Common Materials for Interior Mouldings and Cost Overview (2026)
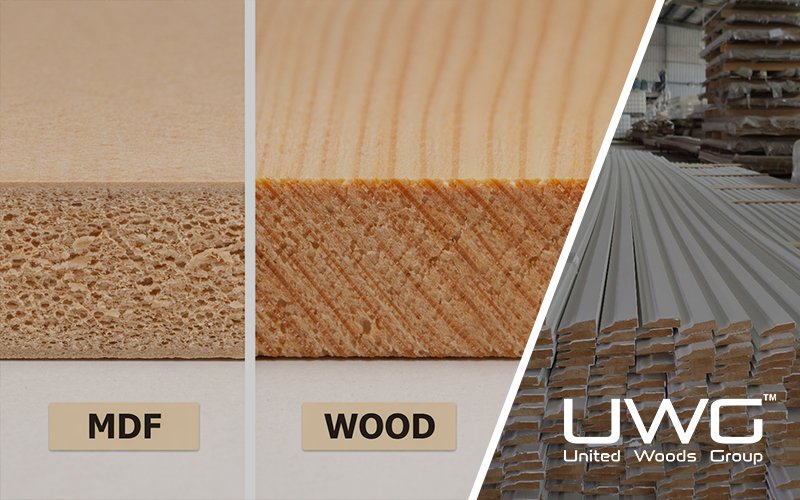
Material selection directly affects moulding durability, appearance, installation difficulty, and long-term maintenance. Below is a practical comparison of the most commonly used moulding materials in residential construction.
The most widely used interior moulding materials today include MDF (Medium Density Fiberboard), Finger Joint Pine (FJ Pine), LVL (Laminated Veneer Lumber), Polystyrene / PVC, and Solid Wood, each offering distinct advantages depending on application, environment, and budget.
2026 Moulding Material Comparison: Pros, Cons & ROI
| Material Type | Expansion / Contraction | Paintability | Moisture Resistance | Best Application Scenarios | Cost Est. ($/LF)* |
|---|---|---|---|---|---|
| MDF (Medium Density Fiberboard) | Low | Perfect (Ultra-smooth surface) | Very Poor (Swells immediately) | Dry areas only. Ideal for budget Crown Moulding & short runs. | $0.80 – $1.50 |
| Finger Joint Pine (FJ Pine) | Medium | Excellent (Natural wood grain) | Low (Needs sealing) | General residential trim. The traditional standard for Baseboards & Casings. | $1.40 – $2.50 |
| LVL (Laminated Veneer Lumber) | Very Low (Engineered for stability) | Very Good (Smooth, usually Primed) | Moderate (Stable structure) | Long-run Baseboards & Casings. The best choice for perfectly straight lines over 16ft+ lengths without warping. | $2.00 – $3.50 |
| Polystyrene / PVC | Zero | Fair (Requires specific paint) | Perfect (100% Waterproof) | Bathrooms, Basements, Garage, & Exteriors. | $1.50 – $3.00 |
| Solid Wood (Oak, Poplar, etc.) | High | Stain Grade (For clear coats) | Medium | Luxury Custom Homes & Historic Restorations (Stain projects). | $4.00 – $10.00+ |
*Note: Prices are estimated based on standard 5-1/4″ Baseboard profiles (e.g., WM 618/620) as of 2026. Bulk builder pricing may vary.
In most residential projects, MDF and FJ pine remain the most cost-effective options, while LVL and PVC are preferred for stability and moisture resistance in demanding environments.

Estimating Moulding Quantities for Construction Projects
For builders and contractors, accurately estimating the quantity of interior mouldings is essential to control costs, reduce waste, and ensure smooth project execution. The total quantity depends on room dimensions, ceiling height, number of doors and windows, and selected moulding types.
- Baseboards: Measure the perimeter of each room and subtract door openings. For standard 8–9 ft ceilings, a single linear foot of baseboard covers one foot of wall length.
- Crown Moulding: Calculate based on room perimeter and ceiling complexity. Irregular layouts may require additional allowances for angles and joints.
- Chair Rails: Measure the length of walls where protection or visual separation is desired. Typically installed 30–36 inches from the floor.
- Casing (Doors & Windows): Count each door and window opening and multiply by the perimeter of the frames. Consider allowances for miters and overlaps.
- Wainscoting / Shiplap / Board & Batten: Measure the lower portion of walls to determine panels needed, factoring in height and style.
- Base Shoe / Quarter Round: Add linear feet to cover flooring expansion gaps, generally matching the baseboard length.
- S4S Boards: Quantity depends on custom applications, such as accent walls, custom trim, or paneling. Cut lengths should be calculated according to design specifications.
Pro Tip from Experts: Always add 5–10% extra material to account for cuts, waste, and on-site adjustments.
By planning moulding quantities in advance, builders can streamline procurement, minimize delays, and maintain project budgets, while achieving consistent quality and a polished interior finish.
Example: Material Quantity Breakdown for a 1,162 sq ft Texas Home

For example, below is a quantity breakdown prepared by our experts for a residential project in Texas. The home has a total area of 1,162 sq ft, and the list includes all required materials—including interior mouldings—along with estimated quantities and approximate pricing based on the project scope.
- MDF Casings (total: ~360 LF)
- Pine Baseboards (total: ~416 LF)
- FJ Pine Door frames (total: ~10 sets)
- 10 pre-primed MDF composite 6 Panel Hollow Core doors (80”)
- SPC Flooring (total: ~1036 SqFt)
- Kitchen cabinet scope (10×10 FT layout) (total: 1 kitchen)
| Material | UWG Factory Price |
|---|---|
| 30″ x 80″ HC Molded Door Slab White primed | $35.00/Set |
| 1/2″ x 5 1/4″ x 16FT Finger Joint Pine Baseboard | $0.55 LF |
| 1/2″ x 3 1/4″ x 16FT MDF Casing | $0.32 LF |
| 1-3/16 in. D x 4-9/16 in. W FJ-Pine Door Jamb Moulding Pack (3-Pack-1header+2legs) package | $20.00/Set |
| (4/0.3+1mm EVA)184mm1220mm SPC flooring | $1.02/SqFt |
| 10×10 Sample Shaker Kitchen Example Layout – RTA Cabinets, Shaker Frame | $1000.00/Package |
*Prices are for reference only; actual pricing may vary based on the final delivery address.
If you prefer not to calculate material quantities yourself, simply send us your project drawings, and our team will handle the full material takeoff and recommendations for you.
Moulding Shapes, Choosing the Right Dimensions, and Finishes
Moulding Styles
Interior mouldings are available in a wide range of styles, each showcasing a unique architectural aesthetic and shaping the overall look and feel of a room. Here’s a detailed breakdown of the most popular styles:
1. Colonial Revival
- Inspired by classic American colonial architecture.
- Features symmetrical shapes, gentle curves, and subtle ornamentation.
- Often used in formal living rooms, dining rooms, and entryways.
- Creates a sense of timeless elegance while maintaining simplicity.

2. Flat Stock
- Minimalist, modern design with square edges and flat surfaces.
- Offers a clean, understated look that complements contemporary interiors.
- Commonly used in modern farmhouses, apartments, and minimalist homes.
- Easy to paint or stain, and suitable for simple wall trims or baseboards.

3. Modern Simplicity
- Characterized by clean lines, low relief details, and subtle geometric shapes.
- Works well with open-concept living spaces and modern furniture.
- Often paired with neutral colors to create a calm, cohesive interior.
- Provides a modern update to traditional trim without being ornate.

4. Classic Elegance
- Slightly more decorative than Colonial Revival, with refined curves and ornamental edges.
- Ideal for formal interiors, upscale homes, and luxury renovations.
- Enhances the perception of height and depth in rooms through taller baseboards or elaborate crown mouldings.
- Works well with chandeliers, paneling, and traditional furniture.

5. Victorian Heritage
- Features highly decorative and intricate profiles with scallops, flutes, or layered detailing.
- Best suited for historic home restorations or period-style interiors.
- Creates a dramatic, opulent atmosphere, often paired with rich colors and antique furnishings.
- Requires careful installation and craftsmanship to maintain visual harmony.

6. Transitional Harmony
- Blends traditional and contemporary elements for versatile design applications.
- Combines the clean lines of modern styles with subtle decorative touches from classic profiles.
- Ideal for homes that bridge modern and traditional aesthetics, such as updated craftsman or suburban homes.
- Offers flexibility for different rooms, allowing consistent design flow throughout the house.

What Are WM Codes?
Interior mouldings come in a variety of profiles, each creating a distinct style with its own unique shape, proportion, and visual impact. To standardize identification across the industry, WM (Weinman Moulding) codes were introduced as a universal reference system for common moulding profiles.
Each WM code represents a specific profile design, allowing builders, designers, and suppliers to communicate clearly without relying on detailed drawings or subjective descriptions.
Below is a summary of several commonly used WM profiles for reference.
| WM Code | Type | Common Size | Style & Features | Visual Profile (Example) |
|---|---|---|---|---|
| WM 356 | Casing | 2-1/4″ | The Standard “Colonial” Classic. Features a rounded edge and a slight concave center. The go-to choice for rentals and budget-friendly projects. |  |
| WM 444 | Casing | 3-1/2″ | The “Grand” Upgrade. A wider version of WM 356. Adds architectural presence and is ideal for rooms with higher ceilings (9ft+). |  |
| WM 623 | Baseboard | 3-1/4″ | The Quintessential Base. Features a distinct “Ogee” curve at the top with a flat vertical face. The industry standard for residential homes. |  |
| WM 620 | Baseboard | 4-1/4″ | The “High-Profile” Base. A taller version of WM 623. Offers superior wall protection and a more upscale, traditional look. | 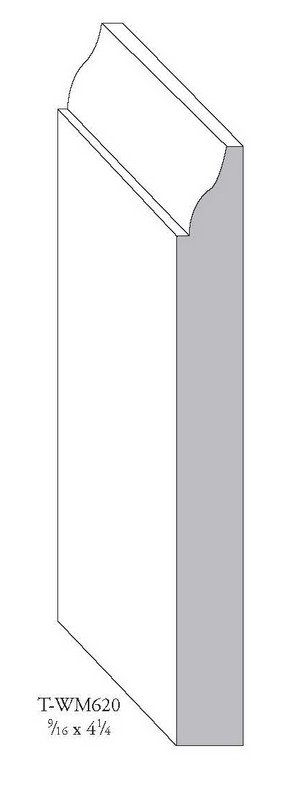 |
| WM 105 | Quarter Round | 3/4″ x 3/4″ | The Ultimate Gap Filler. Shaped like a quarter circle. Essential for covering expansion gaps between flooring and baseboards. |  |
| S4S (1×4) | Flat Stock | 3-1/2″ (Actual) | Modern Simplicity. Square edges on all 4 sides with no pattern. The top choice for 2026 Modern Farmhouse & Minimalist designs. |  |
UWG maintains its own proprietary SKU system. Builders only need to provide the corresponding WM codes for the required moulding products, and UWG will handle the profile matching. Our available profiles extend far beyond the examples shown here—please refer to our moulding catalog for the full selection.
Moulding Dimension Calculator: How to Determine the Right Size
Selecting the right dimensions for interior mouldings is not just about personal preference—it’s about proportional balance, visual harmony, and functionality. Here’s a practical guide to calculating dimensions for different types of mouldings, including baseboards, crown mouldings, chair rails, and casing.
1. Baseboards (Floor-Level Mouldings)
Baseboards protect walls and define the room’s visual foundation. To calculate an appropriate height:
- Standard Ceiling Height (8 ft / ~2.4 m): 3-1/4” – 5-1/4” height (8.2 – 13.2 cm), 5/8” – 3/4” thickness (1.6 – 1.9 cm).
- 9 ft Ceilings (~2.7 m): 4-1/4” – 5-1/2” height (10.8 – 13.8 cm).
- 10+ ft Ceilings (~3 m or higher): 5-1/2” – 7-1/4” height (13.8 – 19.2 cm), thickness 3/4” – 1” (1.9 – 2.5 cm).
Proportional Rule: Traditionally, a baseboard height of 1/2” to 3/4” per foot of ceiling height ensures the moulding looks balanced—neither too thin in large spaces nor too overpowering in smaller rooms.
Thickness Consideration:
- Thicker baseboards (3/4” – 1”) create a solid, upscale appearance, ideal for formal or open spaces.
- Thinner baseboards (5/8”) provide subtle elegance, suitable for smaller or modern minimalist rooms.
2. Crown Mouldings (Ceiling-Level Mouldings)
Crown mouldings visually connect walls and ceilings, and their height and projection should complement ceiling height:
- 8 ft ceilings: 3” – 5” height, projection 3/4” – 1-1/4”.
- 9 ft ceilings: 4” – 6” height, projection 1” – 1-1/2”.
- 10+ ft ceilings: 6” – 8” height, projection 1-3/4” – 2-1/4”.
Rule of Thumb: Crown moulding height is often 1/12 to 1/10 of ceiling height, providing proportionate visual impact. Taller ceilings can accommodate larger, more elaborate profiles for a dramatic effect.
3. Chair Rails (Mid-Wall Mouldings)
Chair rails protect walls from furniture and define wall sections:
- Standard placement: 32” – 36” (~0.8 – 0.9 m) from the floor.
- Adjustable for higher ceilings: For rooms above 9 ft, consider 36” – 42” height for better proportion.
Tip: Chair rails should generally be 1/3 of the way up the wall for optimal balance, though style and furniture placement can influence the exact height.
4. Wainscoting / Paneling
Wainscoting covers the lower portion of walls for both protection and aesthetics:
- Typical height: 32” – 48” (~0.8 – 1.2 m).
- Proportional guide: Generally, half the wall height works well for standard rooms; taller rooms can use 2/3 wall height for more dramatic effect.
Panel Thickness: 1/2” – 3/4” is common; thicker panels add depth and a sense of luxury.
5. Window & Door Casing
Casing frames windows and doors, defining openings:
- Width: 2-1/4” – 4” for standard doors; wider for high ceilings or grand entrances.
- Thickness: 3/4” – 1” for standard residential applications.
- Tip: Ensure casing proportionally matches baseboards and crown mouldings for a harmonious visual hierarchy.
6. Quarter Round & Base Shoe
These small trims cover flooring gaps and complete the baseboard look:
- Typical size: 3/4” × 3/4” (19 mm × 19 mm)
- Thicker or larger profiles can be used for high-end finishes or wider baseboards.
Expert Tip: Sometimes breaking the conventional height can create a striking effect. For example, installing 7” baseboards in a standard 8 ft room can add dramatic personality and visual interest, transforming an ordinary space into a statement interior.

Common Surface Finishes for Interior Mouldings
The surface finish of interior mouldings plays a key role in both aesthetic appeal and long-term durability. Choosing the right finish ensures that mouldings complement the room’s design while withstanding daily wear. Common options include:
- Primed – Pre-primed boards arrive ready for on-site painting, saving labor and ensuring consistent coverage across rooms. Perfect for builders looking for efficiency and uniformity.
- Painted – Provides a smooth, uniform finish and works especially well on MDF and finger-jointed pine. Painted mouldings are highly versatile and compatible with virtually any interior color scheme.
- Stained or Clear-Coat – Enhances and showcases the natural wood grain, making it ideal for solid wood mouldings in high-end or historic projects. Offers a classic, timeless look while protecting the wood surface.
Choosing the Right Finish: Consider the material type, room function, style of the project, and desired visual impact. A well-selected finish not only enhances the interior aesthetic but also contributes to the moulding’s durability and longevity.
We typically recommend that clients choose a primed finish for their mouldings. Since mouldings are installed with nails or fasteners, a pre-primed surface ensures consistent coverage, reduces on-site preparation, and minimizes the risk of paint damage during installation.

Installation and Maintenance of Interior Mouldings
Installation Guide for Interior Mouldings
Proper installation determines over 70% of the final visual quality of interior mouldings.Even premium materials will look poorly finished if alignment, fastening, or joint treatment is incorrect.
Different types of mouldings—baseboards, crown mouldings, chair rails, and casings—require slightly different approaches.The following guidelines are based on proven industry practices and professional experience.
General Preparation for All Mouldings
Before cutting or installing any moulding:
- Tools Required: Miter saw (or miter box with back saw), coping saw, nail gun, measuring tape, stud finder, level, wood glue, caulk, wood filler, sandpaper, and safety gear (glasses and ear protection).
- Surface Prep: Remove old mouldings and clean wall-floor junctions. If installing over new flooring, allow 2–3 days for acclimation. Many professionals recommend painting or priming before installation—touch-ups for nail holes are easier than repainting an entire wall.
- Measurement: Follow precise measuring techniques: for long mouldings, allow a slight overhang to “snap” into place; for short pieces, allow a small margin to slide in easily. Record all cuts and proceed systematically around the room in a counter-clockwise direction.
Baseboards
Baseboards run along the floor-wall junction and protect walls from scuffs:
- Corner Treatments:
- Inside Corners: Use coping joints for irregular corners or miter joints (45°) for standard angles. Coping allows for natural expansion and contraction.
- Outside Corners: Always use 45° miter joints reinforced with wood glue.
- Nailing: Nail through the thickest portion of the baseboard into studs, typically every 16 inches. For taller baseboards, consider using two nails per stud. Nail placement near outside corners should be 1–2 inches from the edge for stability.
- Finishing: Fill nail holes with wood filler, apply caulk at wall junctions, sand smooth, and touch up paint as needed.
Crown Mouldings
Crown mouldings bridge the wall and ceiling, requiring precise angles:
- Miter & Coping: For corners, miter cuts are standard; coping is recommended for inside corners to ensure a tight, seamless fit.
- Fastening: Use finishing nails into studs and apply a small amount of construction adhesive for extra support.
- Alignment: Check for level along the ceiling line and use a laser or level to maintain straight alignment.
- Finishing: Caulk gaps between moulding and wall/ceiling, fill nail holes, and sand smooth before painting or finishing.
Chair Rails and Wainscoting
Chair rails divide wall sections and protect against furniture:
- Placement: Standard placement is 32–36” from the floor, adjusted proportionally for taller rooms.
- Attachment: Nail through rails into studs or use adhesive for additional hold. Ensure panels are level and aligned.
- Joints: Inside corners can be coped or mitered; consistency ensures visual harmony.
Door & Window Casings
Casings frame openings and require attention to detail:
- Measuring: Cut pieces slightly longer than needed for snug fit; scribe edges if walls are uneven.
- Installation: Nail into studs with finishing nails, use wood glue for added stability at corners.
- Finishing: Fill nail holes, caulk gaps between casing and wall, and touch up paint or stain.
Tips for All Mouldings
- Patience and Precision: Accurate measuring, careful cutting, and attention to alignment are critical.
- Material Considerations: Different materials (MDF, finger-jointed pine, solid wood) behave differently—allow for expansion/contraction as needed.
- Final Touches: Proper caulking, filling, and sanding make the difference between amateur and professional results.

Common Pitfalls and How to Avoid Them
Even experienced builders encounter challenges during moulding installation. Some common issues include:
- Uneven Corners or Gaps: Often caused by inaccurate measurements or wall irregularities. Solution: Measure twice, cut once, and use flexible caulk to fill minor inconsistencies.
- Nail Pops or Splitting: Improper nail selection or lack of pre-drilling can cause visible nail marks or wood splitting. Solution: Use the correct nail size and pre-drill when necessary.
- Material Warping or Expansion: Changes in humidity can affect MDF or wood mouldings. Solution: Acclimate materials on-site before installation and allow for expansion gaps where needed.
- Mismatched Profiles or Heights: Inconsistent heights or profiles can break visual harmony. Solution: Plan according to ceiling height, room scale, and design style before cutting and installing.
Moulding Maintenance and Repair
Even after professional installation, interior mouldings require regular maintenance to retain their aesthetic appeal and structural integrity. Many issues arise simply from neglect or improper care. Here are the most common maintenance pitfalls and how to avoid them:
1. Dust and Dirt Accumulation Mouldings, particularly baseboards and chair rails, are prone to collecting dust faster than other surfaces.
- Solution: Wipe regularly with a microfiber cloth or use a vacuum attachment. For deeper cleaning, use a slightly damp cloth with mild soapy water, taking care not to over-wet materials like MDF, which can swell.
2. Minor Scratches and Paint Damage Small nicks, chips, or peeling paint are inevitable over time.
- Solution: Address damage immediately with wood filler or putty, followed by touch-up paint. For caulked edges that crack or pull away, reapply a fresh layer to maintain smooth lines. Loose sections can often be stabilized with finishing nails or a small amount of adhesive.
3. Moisture and Humidity Issues Fluctuating humidity can cause wood and MDF mouldings to warp, expand, or contract.
- Solution: Maintain stable indoor humidity levels, especially in bathrooms, kitchens, or basements. Inspect mouldings periodically for warping or swelling and address minor issues promptly.
4. Severe Damage or Replacement Needs Sometimes a section of moulding is too damaged to repair.
- Solution: Carefully remove the damaged piece, take it to a supplier to find a matching profile, cut to size, reinstall following proper installation techniques, and finish to blend seamlessly with existing mouldings.

2026 Interior Moulding Trends and Tips
In 2026, interior mouldings are increasingly recognized as both functional and decorative elements, enhancing room proportions, depth, and overall style. Current trends focus on aesthetic appeal, durability, and practical installation.
1. Layered Mouldings for Depth and Character
Combining baseboards, chair rails, and crown mouldings creates layered, dimensional walls that elevate architectural interest. This technique is widely applied in professional residential and commercial projects to add sophistication without overwhelming the space.
Tip: Pair subtle profiles with bolder mouldings to achieve visual depth while maintaining balance.

2. Modern Simplicity and Minimalism
Flat, clean profiles such as S4S boards and flat stock mouldings emphasize straight lines and seamless joins. Minimalist mouldings complement contemporary and transitional interiors by highlighting clean geometry and understated elegance.
Tip: Use neutral paints or natural wood stains to maintain a sleek, cohesive look. These approaches are supported by standard interior design practices and widely adopted by experienced builders.

3. Bold Baseboards and High-Profile Trim
Taller baseboards, typically 5–7 inches or higher, are trending in rooms with higher ceilings. They enhance wall proportions, make ceilings appear taller, and create a strong visual statement.
Tip: Combine tall baseboards with chair rails or wainscoting to define wall sections and guide the eye vertically, following best practices from architectural design references.

4. Mixed Material Finishes
Mixing materials—like painted MDF with natural wood or PVC with stained accents—adds texture and visual interest while maintaining durability. This is especially effective in high-traffic or moisture-prone areas such as kitchens, bathrooms, and entryways.
Tip: Apply contrasting finishes selectively to highlight architectural features without cluttering the design, following widely accepted building and interior design guidelines.

5. Historic Revival with Modern Materials
Victorian and Colonial Revival mouldings are making a comeback, often paired with engineered or primed MDF for easier installation and low-maintenance performance. This trend offers classic aesthetics with modern functionality, commonly implemented in both restoration projects and contemporary builds.
Tip: Match ornate profiles with finishes that suit the room’s color palette and function, while ensuring proper installation according to industry standards.

Why These Trends Work
Successful moulding applications in 2026 balance proportion, material choice, finish, and layering. When carefully planned and installed, mouldings enhance visual depth, protect walls, and maintain long-term durability, reflecting the standards followed by experienced builders and designers across residential and commercial projects.
Frequently Asked Questions about Interior Moulding (Builder Focused)
Q1: What is the best material for baseboards in humid areas?
A: For bathrooms, basements, or humid environments, PVC or Polystyrene is recommended due to its waterproof performance and minimal expansion/contraction. For standard residential projects in dry areas, Finger Joint Pine (FJ Pine) remains the industry standard.
Q2: How much do baseboards cost in 2026?
A: Material-only pricing for baseboards typically ranges from $1.20 to $3.50 per linear foot for MDF or FJ Pine, based on standard residential profiles. Builders should allow 5–10% overage for waste, cuts, and on-site adjustments.
Q3: What is the standard baseboard height for 8 ft ceilings?
A: For 8 ft ceilings, baseboards are typically 3-1/4″ to 5-1/4″ in height. A common proportional guideline is 1/2″–3/4″ of baseboard height per foot of ceiling height.
Q4: What is the difference between WM 623 and WM 620 baseboards?
A: WM 623 is the standard 3-1/4″ ogee-style baseboard commonly used in residential construction. WM 620 is the taller 4-1/4″ high-profile version, offering improved wall protection and a more upscale appearance, especially in larger rooms or homes with higher ceilings.
Q5: What material is best for long, straight baseboard runs (16 ft or longer)?
A: For long continuous runs (16 ft+), LVL moulding is recommended due to its superior straightness and dimensional stability, helping reduce joint separation and callback issues.
Q6: Is MDF suitable for crown moulding?
A: Yes. MDF is commonly used for crown moulding in dry interior spaces because of its smooth, paint-ready surface. It is not recommended for moisture-prone areas such as bathrooms or basements.
Q7: Should baseboards be installed before or after flooring?
A: Baseboards are typically installed after flooring for a clean finish. Base shoe or quarter round is then added to cover flooring expansion gaps and minor floor irregularities.
Q8: How much extra moulding should builders order?
A: Builders should plan for 5–10% additional material to account for miter cuts, coping joints, wall irregularities, and jobsite waste. Complex layouts may require a higher allowance.
Q9: What finish is recommended for builder-grade trim packages?
A: Pre-primed mouldings are recommended for most builder-grade projects. They reduce jobsite prep time, ensure consistent paint coverage, and simplify touch-ups after installation.
Q10: What are the trending interior moulding specifications for 2026?
A: Builder-driven trends for 2026 include layered moulding packages for added depth, flat stock / S4S boards for modern and farmhouse-style projects, and taller baseboards (5–7″+) to improve wall proportion and perceived ceiling height.
Conclusion: Elevate Your Interiors with Thoughtful Moulding Choices
Interior mouldings are no longer just decorative—they define a room’s character, proportions, and perceived value. Choosing the right style, material, and finish ensures your spaces are both beautiful and functional, while proper installation and maintenance maximize longevity.
Next Steps for Your Project:
- Review your ceiling height, room dimensions, and design style.
- Select moulding types and finishes that complement your interior.
- Plan material quantities in advance to reduce waste and stay on budget.
- Consider professional installation or detailed guides to ensure a polished finish.
With careful planning and thoughtful execution, interior mouldings can transform ordinary rooms into cohesive, refined, and visually striking spaces—an investment that pays off in both style and long-term value.