Sloped ceilings make rooms look elegant—but they complicate crown moulding installation. Builders often struggle with angles, transitions, and inconsistent heights. Don’t let that stop you. In this guide, I’ll break down exactly how to choose, cut, and install crown moulding on any angled or vaulted ceiling, without the guesswork.
To install crown moulding on a sloped ceiling, first identify the ceiling type—vaulted, cathedral, or curved. Choose flexible or segmented moulding in shapes and sizes suited to the ceiling pitch. Use angle finders and a compound miter saw for precise cuts. Always dry-fit first, and support uneven surfaces with backing boards. Avoid rushed cuts, skipped measurements, and mismatched angles—these are the most common errors. Take safety precautions, double-check angles, and plan transitions before nailing anything in place.
Now that you have the quick answer, let’s break down each key area—roof types, materials, tools, mistakes, and expert installation tips—to make your next project a success.
What Type of Sloped Ceiling Are You Working With?
Understanding your ceiling style is step one. Crown moulding behaves differently depending on slope direction, ceiling height, and corner geometry.
- Vaulted ceilings rise at an angle from opposite walls and usually meet at a central ridge. These are common in great rooms or open-plan living spaces.
- Cathedral ceilings follow the pitch of the roofline and are symmetrical. They’re typically found in older homes or high-end renovations.
- Angled walls—like those in bonus rooms, attic conversions, or dormers—may only slope in one direction, often requiring asymmetric cuts.
- Curved or arched ceilings are rare but elegant, and they demand flexible materials or segmented trim pieces.
Each ceiling type impacts how moulding transitions at corners and how it visually balances the space. Planning for this ahead of time saves frustration and wasted material.

How to Choose the Right Crown Moulding for Angled Walls
Not all crown moulding profiles and materials work well on sloped or uneven surfaces. Here’s how to choose the right type:
Profile Shape
- Simple profiles, like cove, ogee, or small step moldings, are best. They’re easier to align and less prone to highlighting flaws.
- Layered or dentil moulding may look stunning on flat ceilings but becomes very difficult to align correctly on slopes.
Size Considerations
- Use larger mouldings (4″+) in tall spaces to create a bold frame effect.
- For low-pitched or attic-style ceilings, stick to mouldings around 2.5–3 inches. Oversized trim can feel overpowering in tight spaces.
Material Options
- MDF is budget-friendly and great for straight cuts—but it’s stiff and not ideal for curves or uneven walls.
- Wood (like pine, poplar, or oak) is durable and can be painted or stained. It’s heavier and requires precise tools.
- PVC or polystyrene trim is lightweight and sometimes flexible—ideal for tricky corners or curved ceilings.
Tip: When shopping online, use keywords like “crown moulding on angled wall” or “trim for vaulted ceiling” to find slope-friendly options.

How to Measure Crown Moulding Angles for Vaulted Ceilings
This is where many installations go wrong. Crown moulding cuts rely on compound angles—meaning you must measure both the ceiling slope and wall connection correctly.
Tools You’ll Need:
- Digital angle finder or protractor
- Crown angle calculator (many are free online)
- Compound miter saw (must tilt and swivel)
Steps to Follow:
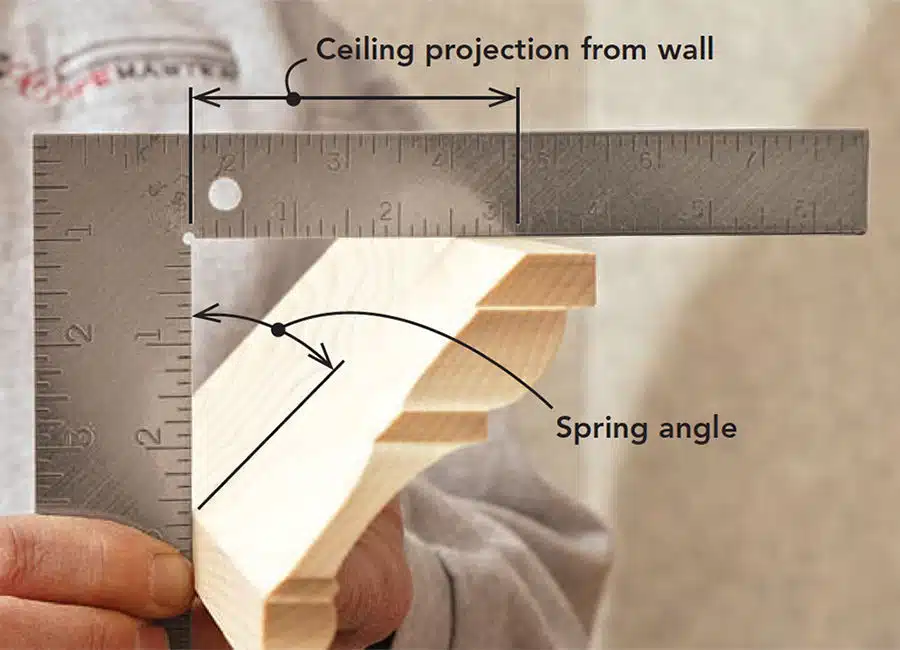
- Measure the angle where wall and ceiling meet. If it’s not a perfect 90 degrees, record the actual measurement.
- Use a crown calculator to determine the correct miter and bevel settings based on your spring angle (usually 38°, 45°, or 52°).
- Label every cut direction (inside right, outside left, etc.) before cutting.
- Always cut test scraps and hold them up before committing to your full piece.
Watch how others do this on YouTube—search “Installing crown moulding on a sloped ceiling YouTube” for helpful videos that show compound cuts in action.
How to Install Crown Moulding on a Sloped Ceiling
Once you’ve chosen the right moulding and taken accurate measurements, it’s time to install.
Step-by-Step Process:
- Snap chalk lines or use a laser level to mark the layout on the wall and ceiling.
- Dry-fit every section of moulding before fastening.
- Cut corners using your miter saw. For cathedral ceilings, you’ll likely need special transition blocks at the peaks.
- Apply construction adhesive to the back of each piece.
- Use a brad nailer or finish nailer to secure the moulding into studs or joists.
- Fill nail holes, caulk gaps, and paint the trim for a clean, finished look.
Bonus tip: For uneven surfaces, press the trim firmly and let the adhesive do some gap-filling before nailing.

What to Do When the Ceiling Is Uneven
This is where most homeowners—and even pros—get stuck. Luckily, there are proven techniques that make sloped installations easier.
Use a Sub-Crown or Backing Board
Install a 1×4 or 1×2 board flat to the wall near the ceiling. This gives you a consistent surface to mount the moulding onto.
- If your ceiling is ½” out of level, mount the board ¼” off the ceiling and let the crown “split the difference.”
- This technique visually hides the gap and gives you a better anchor point for nails.
Other Options
- For severe unevenness, use flexible moulding that can conform to curves.
- Caulk can hide small gaps (⅛” or less), but don’t rely on it for major fixes.
This approach is essential when working with trim on angled ceiling surfaces or older homes with settling issues.
Common Crown Moulding Mistakes to Avoid
Let’s avoid headaches and callbacks. Here’s what to watch for:
- Incorrect angles: Even 1° off will throw the whole corner alignment.
- Short cuts: Always err on the side of longer pieces. You can shave more off—but you can’t add it back.
- Skipping dry-fit checks: Always hold pieces in place before final cuts or nailing.
- Using stiff trim on curves: Avoid rigid MDF or hardwood on uneven ceilings. Opt for flexible trim instead.
Pro tip: Use painter’s tape to “mock up” your layout before committing. You’ll spot problem areas early.

Pro Builder Tips for a Smooth Installation
- Label cuts clearly on each board.
- Pre-paint trim before installing—it’s faster and easier to touch up later.
- Use a caulking gun with a steady hand to close gaps between the wall and ceiling.
- Watch videos of real-world installs—especially where ceilings meet at complex transitions.
- Keep a notebook of bevel/miter settings for different spring angles and ceiling types.
The more prepared you are, the more likely your install will go smoothly and look professional.

Summary
Installing crown moulding on a sloped ceiling takes more planning, but the results are worth it. By choosing the right moulding, using the right tools, and avoiding rookie mistakes, you can achieve clean lines and crisp corners—no matter the ceiling type. Got questions or tips? Drop them below and let’s build better, together.